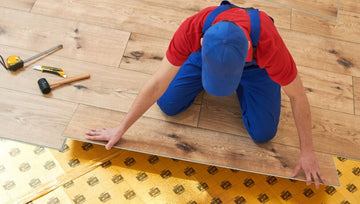
To fit vinyl flooring, start by measuring the room and cutting the vinyl to fit the floor accurately. Then, remove any existing flooring, clean and prepare the subfloor, and apply adhesive before laying down the vinyl.

Credit: www.facebook.com

Preparing For Installation
Before you begin installing vinyl flooring, it’s important to properly prepare the area. This involves gathering the necessary tools and materials, choosing the right type of vinyl flooring, and preparing the subfloor. By following these steps, you’ll ensure a smooth and successful installation that will last for years to come.
Stronggathering The Necessary Tools And Materials/strong

To start your vinyl flooring installation, make sure you have all the tools and materials you’ll need. Here’s a list of what you should gather:
| Tools | Materials |
|---|---|
|
|
Strongchoosing The Right Vinyl Flooring Type/strong
When it comes to vinyl flooring, there are several types to choose from. It’s important to select the right type that suits your needs and preferences. Consider the following factors:
- Durability: Look for vinyl flooring with a wear layer that is suitable for the amount of foot traffic in the area.
- Water resistance: If you’re installing vinyl flooring in a bathroom or kitchen, opt for a waterproof or water-resistant type.
- Installation method: Decide between vinyl tiles or sheets, and choose a type that aligns with your installation skill level.
- Design and style: Vinyl flooring comes in a wide variety of colors, patterns, and textures, so choose one that complements your overall interior design.
Strongpreparing The Subfloor/strong
Before laying the vinyl flooring, it’s crucial to prepare the subfloor properly. Here are the steps to follow:
- Clean the subfloor thoroughly, removing any dirt, debris, or adhesive residue.
- Repair any damaged areas, such as cracks or uneven spots, using a suitable patching compound.
- Sand down high spots and remove any existing flooring that may interfere with the vinyl installation.
- Check the subfloor for moisture. If necessary, use a moisture barrier or underlayment to protect the vinyl flooring.
- Allow the subfloor to dry completely before proceeding with the installation.
By taking the time to gather the necessary tools and materials, choosing the right vinyl flooring type, and properly preparing the subfloor, you’ll be setting yourself up for a successful vinyl flooring installation. With these important steps completed, you can move on to laying the vinyl flooring and enjoying the beautiful and durable results.
Step-by-step Installation Process
This step-by-step installation process provides clear instructions on how to fit vinyl flooring, ensuring a successful and professional installation. Each guideline is easy to follow and helps to achieve a seamless and durable finish.
Acclimating The Vinyl Flooring
Before you start installing your vinyl flooring, allow it to acclimate to the room temperature. Ensure that the vinyl planks are stored in the room where they will be installed for at least 48 hours. This ensures that the planks adjust to the environment, reducing the risk of expansion or contraction after installation.
Measuring And Cutting The Vinyl Planks
Accurate measurements are crucial when fitting vinyl flooring. Measure the length and width of the room, accounting for any irregularities such as doorways or corners. Use these measurements to calculate the amount of vinyl planks needed. When cutting the planks, make sure to leave a small gap between the planks and the walls to accommodate for expansion.
Laying The First Row
Start by laying the first row of vinyl planks along the longest wall in the room. Ensure the planks are aligned tightly against each other, using a tapping block and rubber mallet if necessary. This initial row sets the foundation for the rest of the flooring installation.
Installing The Rest Of The Vinyl Flooring
Once the first row is laid, continue installing the rest of the vinyl flooring. As you work, stagger the planks to provide a more natural and visually appealing look. Use a utility knife to trim the planks as needed, ensuring a neat and snug fit. Take your time to ensure each plank is properly aligned and securely in place.
Handling Corners, Doorways, And Irregular Spaces
When reaching corners, doorways, or irregular spaces, you may need to make additional cuts for a seamless installation. Use a miter saw or a coping saw to trim the planks to fit perfectly around these areas. Pay attention to details to achieve a professional finish and maintain the overall aesthetic of the vinyl flooring.
Securing And Finishing The Installation
After installing all the vinyl planks, ensure that they are securely in place. Use a rolling pin or a hand roller to firmly press down on the flooring, ensuring proper adhesion. If necessary, apply transition strips or molding to cover any gaps or transitions between different flooring types. Finally, give the flooring one last inspection to ensure a flawless finish.
Tips And Tricks For A Flawless Installation
Installing vinyl flooring can be a great way to transform the look of your space. Whether you’re a seasoned DIY enthusiast or a novice looking to tackle a new project, these tips and tricks will help ensure a flawless installation. From using adhesive properly to handling bubbles and wrinkles, and from aligning the planks perfectly to providing proper expansion gaps, we’ve got you covered. We’ll also provide cleaning and maintenance tips to keep your vinyl flooring looking its best for years to come. Read on to discover the secrets of a successful vinyl flooring installation!
Using Adhesive Properly
Properly applying adhesive is essential for a long-lasting and secure vinyl flooring installation. To ensure optimal results, follow these steps:
- Clean and dry the subfloor thoroughly before starting. Any dirt or moisture may compromise the adhesive’s effectiveness.
- Apply the adhesive evenly using a recommended trowel or roller, following the manufacturer’s instructions.
- Let the adhesive set for the recommended time before laying down the vinyl planks. This will ensure a strong bond.
Dealing With Bubbles And Wrinkles
Bubbles and wrinkles can be a common issue when installing vinyl flooring, but with the right techniques, you can easily smooth them out:
- Start by rolling the vinyl planks with a weighted roller, working from the center towards the edges to remove any air pockets.
- If you encounter persistent bubbles or wrinkles, gently lift the affected area and reapply adhesive before rolling it again.
- Use a heat gun or hairdryer on a low setting to soften the vinyl if necessary, making it more pliable and easier to work with.
Ensuring Proper Alignment
Proper alignment is key to achieving a professional-looking finish. Follow these tips to ensure your vinyl flooring planks are perfectly aligned:
- Start by measuring and marking the center point of the room.
- Place the first plank along the centerline, ensuring it’s perfectly straight and parallel to the walls.
- Continue installing the planks, interlocking them securely and using a tapping block when needed.
- Regularly check the alignment throughout the installation process, making adjustments as necessary.
Providing Proper Expansion Gaps
Allowing for proper expansion and contraction of vinyl flooring is critical to avoid unsightly buckling or warping over time. Follow these guidelines for providing the necessary expansion gaps:
- Leave a gap of 1/4 inch around the perimeter of the room to accommodate expansion.
- Use spacers to maintain a consistent gap between the planks and the walls as you install them.
- Ensure any transitions between different flooring materials or rooms have proper expansion gaps as well.
Cleaning And Maintenance Tips
To keep your vinyl flooring looking its best, follow these cleaning and maintenance tips:
- Sweep or vacuum regularly to remove dirt and debris that can scratch the surface.
- Wipe up spills immediately to prevent stains and water damage.
- Use a damp mop with a mild vinyl floor cleaner for regular cleaning.
- Avoid using harsh chemicals, abrasive cleaners, or steam mops, as they can damage the vinyl.

Credit: buildmyplace.com
Credit: buildmyplace.com
Frequently Asked Questions For How To Fit Vinyl Flooring
How Do You Prepare The Subfloor For Vinyl Flooring?
To prepare the subfloor for vinyl flooring, start with a clean and level surface. Remove any debris and repair any cracks or damage. Ensure the subfloor is dry and free from moisture. Use a moisture barrier if necessary. Install an underlayment if recommended by the vinyl flooring manufacturer.
Can Vinyl Flooring Be Installed Over Existing Flooring?
Yes, in most cases, vinyl flooring can be installed over existing flooring. However, it is crucial to ensure that the existing flooring is clean, level, and properly adhered. Remove any loose or damaged flooring and fill in any gaps or uneven areas.
Consult the vinyl flooring manufacturer’s guidelines for specific instructions.
How Do You Cut Vinyl Flooring?
To cut vinyl flooring, measure the area and mark the desired cutting line on the back of the vinyl plank or tile. Use a utility knife or vinyl cutter to make a straight cut along the marked line. Ensure a clean and precise cut by applying moderate pressure and following the line closely.
Repeat for multiple cuts if needed.
Conclusion
Fitting vinyl flooring is a DIY project that anyone can tackle with the right tools and knowledge. By following the steps outlined in this guide, you can ensure a professional-looking result. Remember to properly prepare your subfloor, choose the right type of vinyl, and follow the manufacturer’s instructions for installation.
With a little patience and attention to detail, you’ll have a beautiful and durable vinyl floor that will enhance the look and value of your space.