To change the Okta Verify device, go to the Okta dashboard, select your profile, and navigate to the Security tab to manage your devices. Okta Verify is a multifactor authentication app that provides an additional layer of security to your Okta account.
However, there may be instances when you need to change the device associated with this app. This could be due to a lost or stolen phone, or if you simply want to switch to a new device. Fortunately, the process to change your Okta Verify device is straightforward.

We will guide you through the necessary steps to ensure a smooth transition. So, let’s get started with a brief overview of the Okta Verify app and its purpose.

Credit: m.youtube.com

Step 1: Install Okta Verify On The New Device
When changing devices, the first step is to install the Okta Verify app on your new device. Follow these simple instructions to ensure a seamless transition:
Download Okta Verify App
1. Open the app store on your new device.
2. Search for “Okta Verify” in the search bar.
3. Tap on the Okta Verify app when it appears in the search results.
4. Click on the “Install” button to begin the download.
Launch The App
1. Once the app is downloaded and installed, locate the Okta Verify icon on your device’s home screen.
2. Tap on the icon to launch the app.
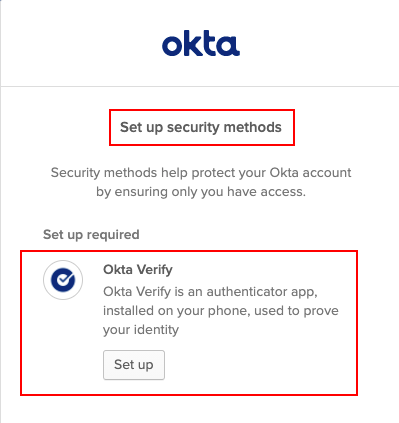
Set Up Okta Verify On The New Device
1. Upon launching the app, you will be prompted to set up Okta Verify. Tap on the “Get Started” button to begin the setup process.
2. You may be asked to grant permissions to the app, such as access to your camera or contacts. Make sure to allow these permissions for a smooth experience.
3. Follow the on-screen instructions to complete the setup. This usually involves scanning a QR code or entering a provided verification code.
4. Once the setup is complete, Okta Verify is ready to use on your new device!
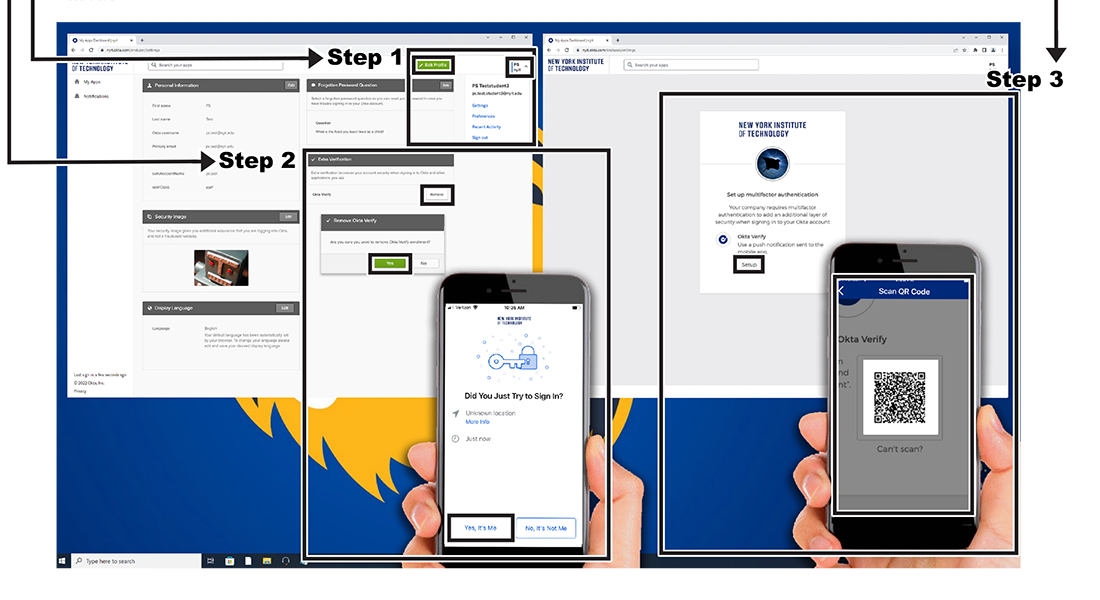
Credit: www.nyit.edu
Step 2: Remove Okta Verify From The Old Device
To change your Okta Verify device, start by removing the app from your old device. This simple step ensures a smooth transition to a new device for secure authentication.
If you’re looking to change the device associated with your Okta Verify app, you’ll need to follow a few simple steps. In this guide, we’ll walk you through the process of removing Okta Verify from your old device. By doing so, you’ll be able to set up your Okta Verify on your new device effortlessly. Let’s get started!Open Okta Verify On The Old Device
To begin, open the Okta Verify app on your old device. This app is easily identifiable by its distinctive blue icon. Once you’ve located the app, tap on it to launch Okta Verify.Access The Settings
Next, we’ll need to navigate to the settings within Okta Verify. Look for the three horizontal lines or the menu icon often found in the top-right or top-left corner of the app screen. Tap on this icon to access the Okta Verify settings.Remove The Device From Okta Verify
Inside the Okta Verify settings, you’ll find various options and preferences. Scroll through the settings until you locate an option to remove the device. This option is typically named “Remove Device,” “Delete Device,” or similar. Tap on this option to proceed with removing the old device from Okta Verify.Note:
Before removing the device, ensure that you have set up your Okta Verify on the new device. This step will prevent any disruptions in your authentication processes. Once you’ve successfully removed the old device from Okta Verify, you’re ready to proceed with setting up Okta Verify on your new device. This process ensures a smooth transition and allows you to continue using Okta Verify seamlessly for all your authentication needs.Step 3: Verify The New Device
After successfully installing Okta Verify on your new device, it’s time to verify the device change. Ensuring the security of your Okta account is of utmost importance. Follow the steps outlined below to complete the verification process.
Launch Okta Verify On The New Device
To begin the device verification process, open the Okta Verify app on your new device. Make sure you have an active internet connection to proceed with the verification smoothly.
Scan The Qr Code
Once you have launched the Okta Verify app, you will be prompted to scan a QR code. Locate the QR code on your computer screen or printed on a physical document. Align your new device with the QR code, and the app will automatically scan it.
Confirm The Device Change
After successfully scanning the QR code, you will see a confirmation message on your new device. This message will verify that the device change has been successfully completed. Take a moment to ensure that all the displayed details match your expectations and confirm the device change.
By following these simple steps, you can effortlessly change your Okta Verify device and continue securely accessing your Okta account. Remember, it is important to keep your devices up to date and to follow best security practices to protect your sensitive information.

Credit: help.okta.com
Frequently Asked Questions Of How To Change Okta Verify Device
How Do I Change My Device For Okta Verify?
To change your device for Okta Verify, you need to first log into your Okta account. Then, go to the Security section and select “Add Device” or “Change Device” option. Follow the prompts to complete the device change process.
Can I Change My Okta Verify Device Remotely?
Yes, you can change your Okta Verify device remotely. Log into your Okta account and go to the Security section. Select the option to “Add Device” or “Change Device” and follow the instructions provided. This allows you to switch your device without physically being present.
What If I Lose My Okta Verify Device?
If you lose your Okta Verify device, you will need to contact your organization’s IT support or Okta administrator. They will help you reset your Okta Verify device and provide you with a new one. It’s important to report the loss as soon as possible to ensure the security of your account.
How Long Does It Take To Change Okta Verify Device?
The time it takes to change your Okta Verify device may vary depending on your organization’s IT policies and procedures. In some cases, it can be done instantly, while in others, it may take a few hours or even days.
It’s best to contact your IT support or Okta administrator for an accurate timeframe.
Conclusion
Changing your Okta Verify device doesn’t have to be a daunting task. By following the simple steps outlined in this blog post, you can easily switch to a new device and continue to enjoy the secure authentication provided by Okta Verify.
Remember to make sure your new device is compatible and to properly remove the app from your old device for a seamless transition. Keep your authentication process simple and stress-free with Okta Verify.