Adjusting opacity in PowerPoint is simple. Just select the object and use the transparency slider.
In PowerPoint, you can easily adjust the opacity of objects by following a few simple steps. By selecting the object you want to modify, you can access the ‘Format’ tab in the toolbar at the top of the screen. From there, locate the ‘Shape Fill’ or ‘Picture Fill’ option and choose the desired object.

Once selected, a sidebar will appear on the right-hand side of the screen. In this sidebar, you can adjust the opacity of the object by dragging the transparency slider to the left or right. This allows you to control the level of transparency, creating unique visual effects and enhancing your presentations with ease.
Understanding Opacity Adjustments

Opacity adjustments are powerful tools in PowerPoint that allow you to control the transparency of objects, such as images, shapes, and text boxes. By adjusting the opacity, you can create stunning visual effects and make your presentations more engaging and professional. This article will guide you through the process of adjusting opacity in PowerPoint, helping you master this essential skill.
What Are Opacity Adjustments In Powerpoint?
Opacity adjustments refer to the ability to modify the transparency level of objects in PowerPoint. When you adjust the opacity of an object, you are essentially tweaking how much light passes through it. By increasing or decreasing the opacity, you can make objects more or less see-through, which can significantly enhance the visual impact of your slides.
Why Are Opacity Adjustments Important In Powerpoint?
Opacity adjustments are crucial in PowerPoint because they offer a range of benefits that can elevate the overall look and feel of your presentations. Here are a few reasons why understanding and utilizing opacity adjustments is important:
- Enhance visual hierarchy: By adjusting the opacity of various elements, you can create a clear visual hierarchy on your slides. For example, reducing the opacity of less important elements can help guide your audience’s attention to the most critical information.
- Add depth and dimension: Opacity adjustments can be used to add depth and dimension to your slides. With careful adjustment, you can create layered effects that give the illusion of objects being in the foreground or background, resulting in more visually appealing presentations.
- Create overlays and blends: Adjusting the opacity allows you to overlay different objects and blend them seamlessly. This technique is useful for creating text overlays on images, combining shapes, or creating unique and artistic visual effects.
- Highlight specific content: By adjusting the opacity of certain elements, you can highlight specific content or make it stand out from the rest. This technique can be particularly effective when presenting data or emphasizing key points.
By understanding the power of opacity adjustments in PowerPoint, you can take your presentations to the next level, making them visually captivating and engaging for your audience.

Credit: www.wikihow.com
Mastering Opacity Adjustments In Powerpoint
Mastering Opacity Adjustments in PowerPoint can help you create visually stunning presentations that captivate your audience. Opacity adjustments allow you to control the transparency of various elements in your slides, giving you the flexibility to create professional-looking designs. In this blog post, we will explore three different techniques for adjusting opacity in PowerPoint: using the transparency slider, applying opacity to images and shapes, and creating gradient transparency.
Using The Transparency Slider
The transparency slider is a simple yet powerful tool in PowerPoint that allows you to adjust the opacity of any selected object. To access the transparency slider:
- Select the object you want to adjust.
- Navigate to the “Format” tab in the PowerPoint toolbar.
- Click on the “Transparency” button, which is represented by a square with a diagonal line.
- Slide the transparency slider left or right to increase or decrease the object’s opacity.
By adjusting the transparency slider, you can create subtle or dramatic visual effects in your slides, such as fading elements in or out, or highlighting specific areas of a slide.
Applying Opacity To Images And Shapes
Not only can you adjust the opacity of entire objects, but you can also apply opacity to specific portions of an image or shape in PowerPoint. Here’s how:
- Select the image or shape you want to modify.
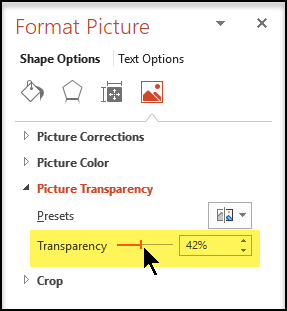
- Right-click on the object and choose “Format Picture” or “Format Shape.”
- In the “Format” pane, navigate to the “Picture” or “Shape Options” tab.
- Find the option for adjusting transparency or opacity.
- Adjust the transparency value to your desired level.
By applying opacity to specific areas, you can create interesting effects and highlight certain portions of an image or shape while keeping others more transparent.
Creating Gradient Transparency
If you want to add a more gradual and sophisticated level of transparency to your objects, you can create gradient transparency in PowerPoint. Here’s how:
- Select the object you want to modify.
- Navigate to the “Format” tab in the PowerPoint toolbar.
- Click on the “Transparency” button and choose “Gradient Transparency.”
- Customize the gradient by adjusting the transparency levels for different stops in the gradient.
With gradient transparency, you can achieve smooth transitions from opaque to transparent, allowing for more complex and visually engaging designs.
Advanced Tips And Techniques
When it comes to creating visually appealing presentations in PowerPoint, adjusting opacity can be a game-changer. Not only does it allow you to control the transparency of different elements, but it also adds depth and visual interest to your slides. In this section, we will explore some advanced tips and techniques for using opacity in PowerPoint.
Animating Opacity Changes
If you want to take your presentations to the next level, consider animating opacity changes. This technique allows you to gradually fade in or fade out objects, creating smooth and professional-looking transitions. To animate opacity changes in PowerPoint, follow these simple steps:
- Select the object you want to modify.
- Navigate to the “Animations” tab in the PowerPoint toolbar.
- Click on “Add Animation” and choose the desired animation effect from the menu.
- Once the animation is added, click on “Effect Options.”
- In the “Effect” tab, scroll down and find the “Opacity” option.
- Adjust the opacity level according to your preference.
- Preview the animation to ensure it meets your expectations.
Using Opacity For Overlays And Backgrounds
Another way to leverage the power of opacity is by using it for overlays and backgrounds. By adding semi-transparent shapes or images over your slide’s content, you can create captivating visual effects and draw attention to specific areas. To apply opacity to overlays and backgrounds in PowerPoint, follow these steps:
- Insert the shape or image you want to use as an overlay or background.
- Click on the object to select it.
- Navigate to the “Format” tab in the PowerPoint toolbar.
- Locate the “Shape Fill” or “Picture Fill” options.
- Click on the drop-down menu and select “More Fill Colors.”
- A dialog box will appear, allowing you to adjust the opacity level using the “Transparency” slider.
- Move the slider to the desired transparency level.
- Click “OK” to apply the changes.
Opacity Adjustments In Picture Tools
In addition to shapes and images, you can also make opacity adjustments in PowerPoint’s Picture Tools. This feature is particularly useful when working with images or clip art. To adjust the opacity of an image in PowerPoint, follow these steps:
- Select the image you want to modify.
- Go to the “Format” tab in the PowerPoint toolbar.
- Click on the “Picture Tools” icon.
- Locate the “Adjust” group.
- Click on the “Transparency” option.
- A drop-down menu will appear, allowing you to adjust the opacity level using the slider.
- Move the slider to increase or decrease the transparency as desired.
- Preview the changes to ensure they enhance your presentation.
Credit: slideuplift.com
:max_bytes(150000):strip_icc()/001_make-shape-transparent-in-powerpoint-5211795-1ab6a390a0a746fe849e3ca3f3e8e0e9.jpg)
Credit: www.lifewire.com
Frequently Asked Questions Of How To Adjust Opacity In Powerpoint
How Do I Adjust The Opacity In Powerpoint?
To adjust the opacity in PowerPoint, select the object or image you want to change. Then go to the “Format” tab, click on “Shape Fill” or “Picture Fill,” and select the “More Fill Colors” option. In the pop-up window, you can adjust the transparency using the slider or by entering a specific percentage.
Can I Adjust The Transparency Of Multiple Objects At Once In Powerpoint?
Yes, you can adjust the transparency of multiple objects simultaneously in PowerPoint. Select all the objects you want to change, then go to the “Format” tab and click on “Shape Fill” or “Picture Fill. ” From there, you can adjust the transparency using the same method as for a single object.
What Is The Purpose Of Adjusting The Opacity In Powerpoint?
Adjusting the opacity in PowerPoint allows you to control the visibility and blending of objects and images. It can be used to create overlays, highlight specific elements, or create a professional and polished look for your presentations. By adjusting the opacity, you can enhance the overall visual impact of your slides.
Conclusion
Adjusting opacity in PowerPoint is a powerful technique that can enhance the visual impact of your presentations. By understanding how to manipulate opacity, you can add depth, highlight important content, and create stunning visual effects. Whether you want to fade images, adjust text transparency, or create layers, opacity adjustments in PowerPoint give you the freedom to express your creativity.
So, master this skill and take your PowerPoint presentations to a whole new level!