To adjust Vland headlights, follow these steps: locate the adjustment screws on the headlights and use a screwdriver to adjust the vertical and horizontal aim of the beams. The proper adjustment of your Vland headlights is essential for ensuring optimal visibility and road safety.
If your headlights are misaligned, they may shine too high, causing glare for oncoming drivers, or too low, reducing your visibility. Adjusting Vland headlights is a straightforward process that you can do on your own. In this guide, we will explain the necessary steps to adjust your Vland headlights properly.

By following these instructions, you can ensure that your headlights are aimed correctly and provide the best lighting for your driving needs. So, let’s get started and ensure your Vland headlights are perfectly aligned.
1. Understanding Vland Headlights

When it comes to upgrading your vehicle’s lighting system, Vland Headlights are a popular choice for car enthusiasts. Designed to improve visibility and enhance the overall aesthetics of your car, these headlights are a perfect blend of style and functionality.
1.1 Overview Of Vland Headlights
Vland Headlights are aftermarket headlights that are specifically designed to fit a wide range of vehicle models. Made with high-quality materials, they are known for their durability and longevity. These headlights feature advanced lighting technology, including LED bulbs, halogen bulbs, and projector lenses, making them more efficient and effective at illuminating the road.
1.2 Benefits Of Vland Headlights
Vland Headlights offer several benefits that make them a popular choice among car owners:
Improved Visibility:
- With their advanced lighting technology, Vland Headlights provide enhanced visibility on the road, ensuring a safer driving experience, especially during low-light conditions.
- The projector lenses in Vland Headlights offer a focused beam of light, reducing glare for oncoming drivers and increasing your own visibility.
Stylish Design:
- Vland Headlights are designed to add a touch of style to your vehicle’s appearance.
- Their sleek and modern design complements the overall look of your car, giving it a more aggressive and refined look.
Easy Installation:
- Vland Headlights are designed as direct replacements for the original headlights, making installation hassle-free.
- They come with all the necessary hardware and wiring, allowing you to install them quickly and easily, without any modifications to your vehicle.
Increased Resale Value:
- By upgrading to Vland Headlights, you can enhance your vehicle’s overall value, making it more enticing to potential buyers.
- The improved lighting performance and stylish design of these headlights can make your car stand out among other listings, giving you an edge in the market.
Understanding Vland Headlights is essential before embarking on the process of adjusting them. These aftermarket headlights offer improved visibility, stylish design, easy installation, and increased resale value. Now that you know the various advantages of Vland Headlights, let’s delve into how to adjust them for optimal performance.

Credit: www.ebay.com
2. Tools And Equipment Needed
Adjusting Vland headlights is an important task to ensure optimal visibility while driving at night. To make the adjustment process smooth and effective, you will need specific tools and equipment. In this section, we will discuss the necessary tools as well as optional tools that can make the job even easier.
2.1 Necessary Tools
Before you begin adjusting your Vland headlights, make sure you have the following tools:
- Socket wrench
- Screwdriver set
- Tape measure
- Level
These tools are essential for accessing and adjusting the various components of the headlight assembly. The socket wrench will allow you to remove any screws or bolts securing the headlights in place. A set of screwdrivers is necessary for loosening and adjusting the different screws and knobs that control the position and angle of the headlights.
The tape measure is useful for measuring the distance between the headlights and the wall or the ground. This measurement will help you determine the right height and alignment for your headlights. Lastly, a level will ensure that the headlights are adjusted to the correct horizontal position.
2.2 Optional Tools
In addition to the necessary tools, there are a few optional tools that can further simplify the process of adjusting Vland headlights:
- Headlight adjustment tool
- Masking tape
- Headlight alignment gauge
- Work light or flashlight
A headlight adjustment tool is designed specifically for adjusting headlights and can make the process more precise and convenient. Masking tape can be used to mark the reference points on the wall or the ground while aligning the headlights. This will allow you to easily see if the adjustment is accurate.
A headlight alignment gauge is another helpful tool that ensures the correct alignment of the headlights. By using this tool, you can quickly check if the headlights are pointing in the right direction.
Finally, a work light or flashlight can be handy when working in low-light conditions. It will help you see the components clearly, making the adjustment process easier.
With the necessary and optional tools at your disposal, you are ready to move on to the next step of adjusting Vland headlights.
3. Step-by-step Guide To Adjusting Vland Headlights
Adjusting Vland headlights is made easy with this step-by-step guide. Learn how to properly adjust the headlights to ensure optimal visibility on the road.
Adjusting the headlights on your vehicle is crucial for ensuring proper visibility and safety while driving at night. If you have Vland headlights installed on your car, it’s essential to know how to adjust them correctly. In this step-by-step guide, we will walk you through the process of adjusting Vland headlights to achieve optimal aim and visibility. By following these instructions, you’ll be able to adjust the vertical and horizontal aim of your headlights, as well as verify and test the adjustment for reliable use on the road.3.1 Preparing The Vehicle
Before you begin adjusting your Vland headlights, it’s essential to prepare your vehicle for the process. Follow these steps to ensure a smooth and efficient adjustment:- Park your car on a flat, level surface, as this will provide an accurate reference point for adjusting the headlights.
- Make sure the vehicle is parked approximately 25 feet away from a flat wall or garage door.
- Turn on your headlights and locate the adjustment screws on the back of the headlight assembly.
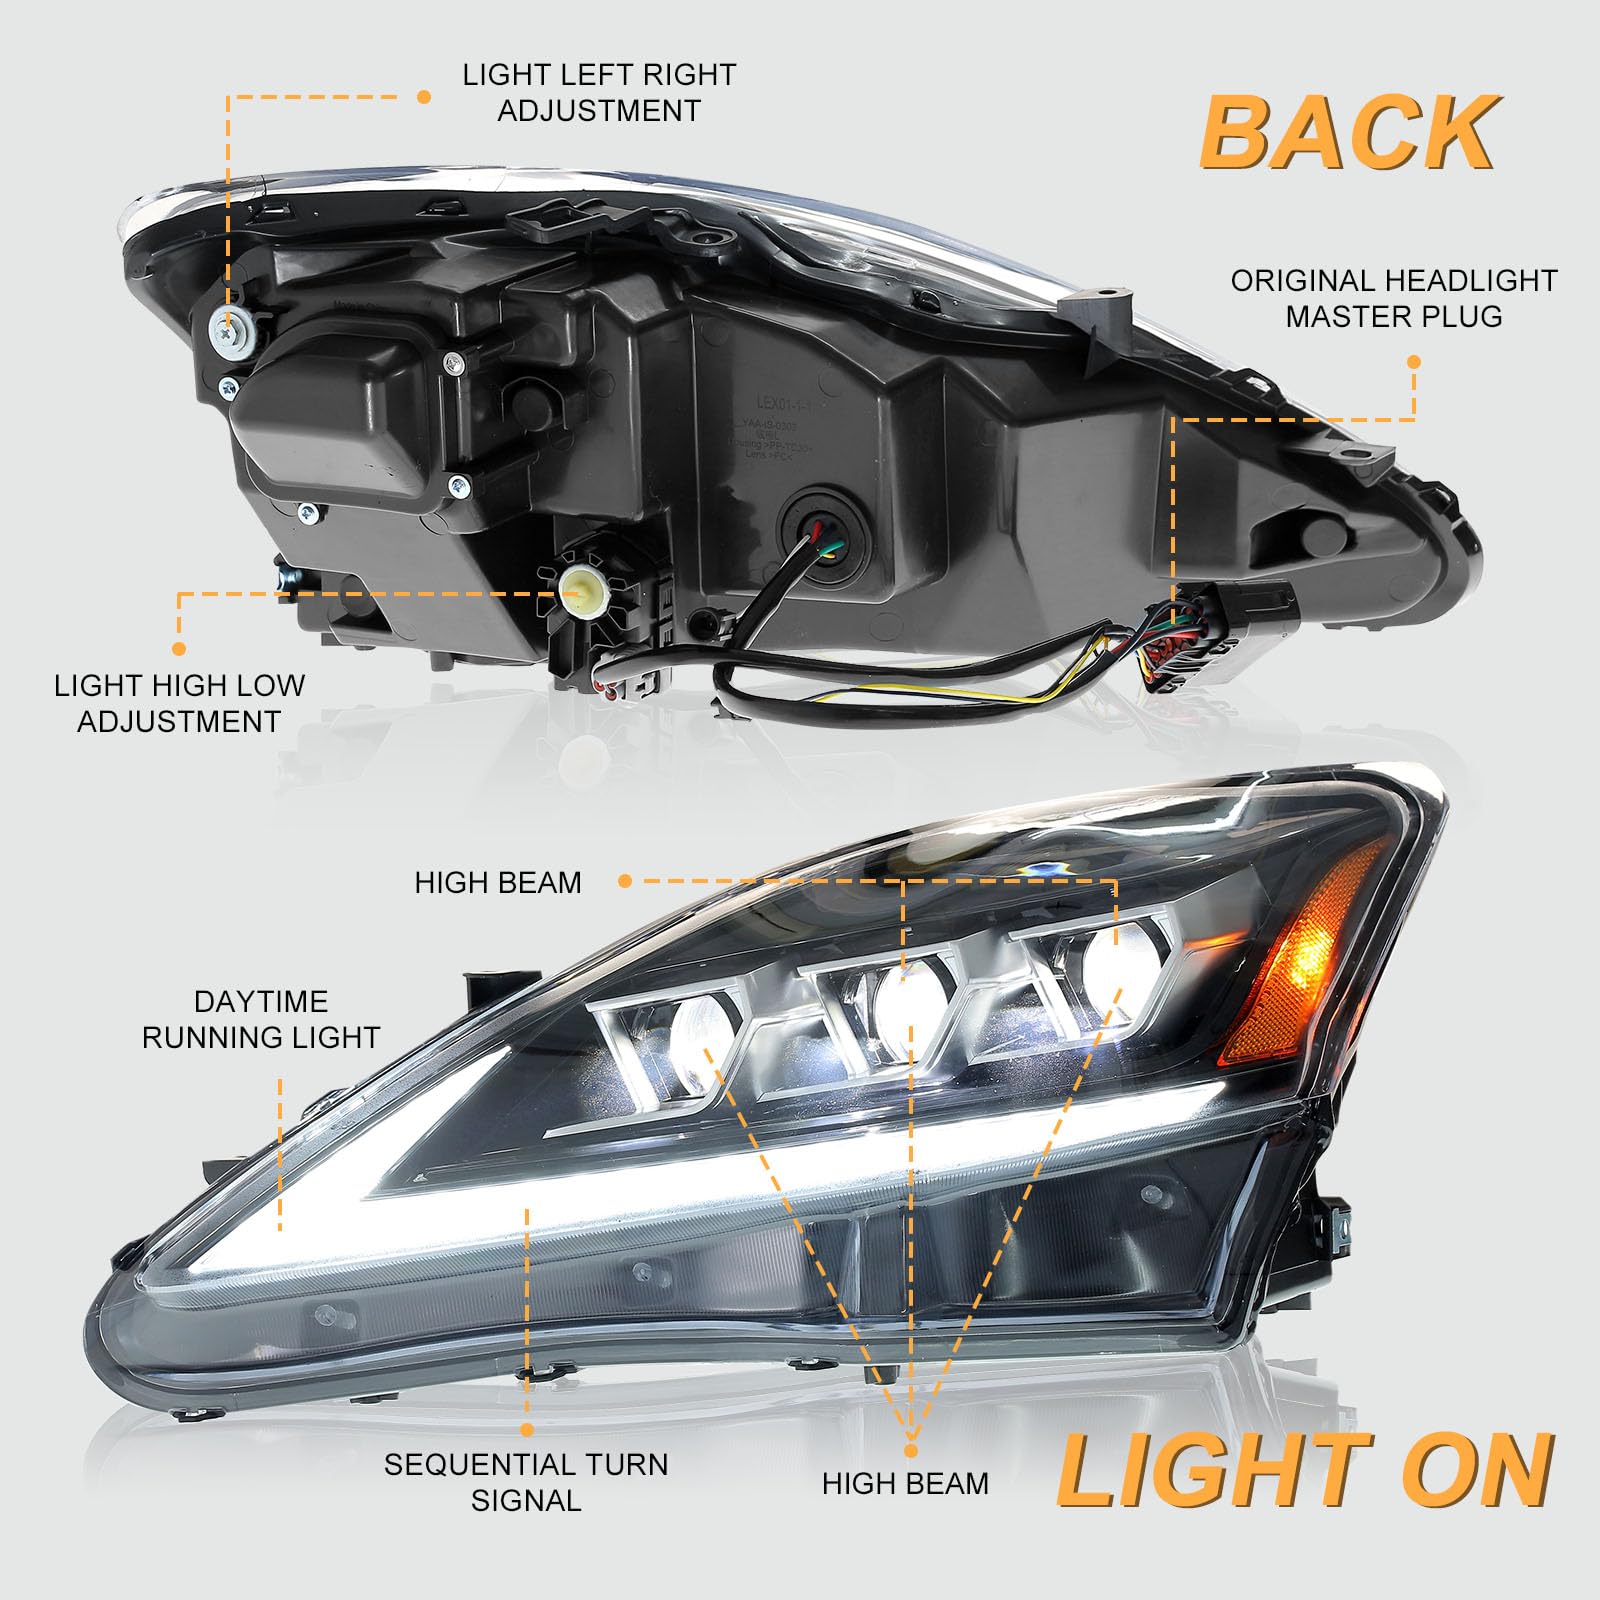
3.2 Identifying The Adjustment Points
To adjust your Vland headlights, you need to identify the correct adjustment points. Here’s how you can find them:| Headlight Adjustment | Horizontal Aim Adjustment | Vertical Aim Adjustment |
|---|---|---|
| Driver’s Side | Hexagonal or Phillips screw | Vertical adjustment wheel |
| Passenger’s Side | Hexagonal or Phillips screw | Vertical adjustment wheel |
3.3 Adjusting The Vertical Aim
To adjust the vertical aim of your Vland headlights, follow these steps:- Locate the vertical adjustment wheel on the back of the headlight assembly.
- Using a Phillips screwdriver or the appropriate tool, rotate the wheel clockwise to lower the aim or counterclockwise to raise the aim.
- Make small adjustments and check the headlight’s aim against the wall or garage door.
- Repeat the adjustment process until the headlights are aimed correctly and provide adequate illumination without blinding oncoming drivers.
3.4 Adjusting The Horizontal Aim
To adjust the horizontal aim of your Vland headlights, follow these steps:- Locate the hexagonal or Phillips screw on the back of the headlight assembly responsible for horizontal adjustment.
- Using the appropriate tool, rotate the screw clockwise to shift the headlight’s aim towards the right or counterclockwise to shift it towards the left.
- Make small adjustments and verify the headlight’s aim against the wall or garage door.
- Repeat the adjustment process until the headlights are aimed correctly and provide proper illumination without causing any visibility issues for other drivers.
3.5 Verifying And Testing The Adjustment
After adjusting the vertical and horizontal aim of your Vland headlights, it’s crucial to verify and test the adjustment for optimal performance. Here’s what you should do:- Turn on your headlights and observe their aim against the wall or garage door.
- Ensure that both headlights are properly aligned and provide even illumination.
- Take your vehicle for a test drive in a dark or low-light area to assess the effectiveness of the adjustment.
- If necessary, make further adjustments until you achieve the desired aim and visibility without compromising the safety of yourself and other drivers on the road.

Credit: eunavi-auto.com

Credit: www.amazon.com
Frequently Asked Questions For How To Adjust Vland Headlights
How Do I Adjust Vland Headlights?
To adjust Vland headlights, first, locate the adjustment screws on the back of the headlight assembly. Use a screwdriver to turn the screws in the appropriate direction to adjust the height and direction of the headlights. Check the alignment by observing the beam pattern on a flat wall.
What Tools Do I Need To Adjust Vland Headlights?
To adjust Vland headlights, you will need a screwdriver, preferably a Phillips or flathead screwdriver, depending on the type of screws used in the headlight assembly. Additionally, you may need a measuring tape or a level to ensure accurate adjustments.
How Do I Know If My Vland Headlights Need Adjustment?
You can tell if your Vland headlights need adjustment if the beam pattern is misaligned, causing the headlights to shine too high, too low, or to one side. Uneven illumination on the road or complaints from other drivers about blinding lights are also signs that adjustment is required.
Can I Adjust Vland Headlights Myself Or Should I Hire A Professional?
You can definitely adjust Vland headlights yourself, as long as you follow the manufacturer’s instructions and use the right tools. However, if you are not confident in your skills or if the adjustment seems complex, it’s advisable to seek professional assistance to ensure proper alignment and avoid any damage.
Conclusion
To sum up, adjusting Vland headlights is a crucial task to ensure optimal visibility and safety while driving. By following the step-by-step guide provided in this blog post, you can easily make the necessary adjustments to align your headlights correctly.
Remember to take your time and be patient during the process. Properly adjusted headlights are essential for providing clarity on the road, reducing glare for other drivers, and minimizing the risk of accidents. So, take charge and make sure your Vland headlights are perfectly aligned for an enhanced driving experience.