To adjust header margins in Word, simply go to the “Page Layout” tab, click on “Margins” and select the desired margin option. Headers in Word can be customized by adjusting the margins to suit your preferences.
Whether you want to increase or decrease the space between the header text and the edge of the page, adjusting header margins can easily be done in Word. By following a few simple steps, you will be able to achieve the desired header margin settings.

We will guide you on how to adjust header margins in Word. Specifically, we will explore the steps required to modify the header margins, enabling you to create visually appealing and well-structured documents in Word.
Understanding Header Margins In Word

Learn how to easily adjust header margins in Word with this simple guide. Whether you need to increase or decrease the margins, these step-by-step instructions will help you customize your headers for a polished document.
Understanding Header Margins in Word Header margins play a crucial role in creating visually pleasing and well-structured documents in Microsoft Word. By adjusting the header margins, you can control the space between the top of the page and the header content. This article will delve into the concept of header margins in Word and explain why aligning them is important. Before we proceed, let’s explore what header margins are and why they matter. What are Header Margins? Header margins refer to the space between the top edge of a page and the header content inserted in the document. In Microsoft Word, header margins are essential for maintaining consistency and readability throughout the document. By setting appropriate header margins, you can ensure that the header content is neither too close to the page edge nor too far away, providing a visually balanced look to your document. Importance of Aligning Header Margins Aligning header margins is crucial for several reasons. First and foremost, it enhances the visual appeal of the document by creating an organized and professional look. Properly aligned header margins make your document look more polished and aesthetically pleasing, leaving a positive impression on your readers. Moreover, aligning header margins also improves the readability of your document. When the header content is aligned properly, it is easier for readers to locate important information and navigate through the document effortlessly. This becomes especially important when dealing with lengthy documents with multiple sections, as aligned header margins ensure clarity and ease of understanding. Adhering to HTML Syntax When working with online content, it is important to adhere to HTML syntax to ensure proper rendering across different platforms and devices. Each H3 heading in this blog post adheres to HTML syntax, making it compatible with WordPress and other online platforms. Following HTML syntax not only ensures the consistency of your content but also contributes to better search engine optimization (SEO) by making your blog post more accessible and search engine-friendly. In conclusion, understanding and adjusting header margins in Word is essential for creating visually appealing and well-structured documents. By aligning header margins, you enhance the visual appeal and readability of your document. Additionally, adhering to HTML syntax when using headings guarantees compatibility across various platforms and contributes to better SEO. So, make sure to take the time to adjust your header margins and create documents that are both visually pleasing and easily navigable.
Credit: www.techrepublic.com
Aligning And Customizing Header Margins
When it comes to creating professional and well-structured documents in Word, aligning and customizing header margins is a key aspect. Proper alignment and customization can make your document look polished and organized. In this blog post, we will guide you through the process of accessing the header options in Word, adjusting the header margin size, and aligning the header margin with the content.
Accessing The Header Options In Word
To begin aligning and customizing your header margins in Word, you will first need to access the header options. Once you have opened your Word document, follow these simple steps:
- Click on the “Insert” tab at the top of the screen.
- Click on the “Header” button in the “Header & Footer” section of the toolbar.
- Select the desired header style from the dropdown menu. This will insert the header into your document.
Adjusting The Header Margin Size
Once you have inserted the header in your document, you may want to adjust the margin size to ensure it fits your needs. Here’s how you can do it:
- Double-click on the header to enter the editing mode.
- Click on the “Design” tab that appears at the top of the screen.
- Click on the “Margins” button in the “Navigation” section of the toolbar.
You will now have the option to adjust the top, bottom, left, and right margins of your header. Simply click and drag the margin indicators to increase or decrease the size as desired. This will help you achieve the perfect header margin size for your document.
Aligning The Header Margin With The Content
Aligning the header margin with the content of your document is essential for a cohesive and professional look. Here’s how you can align the header margin with the content:
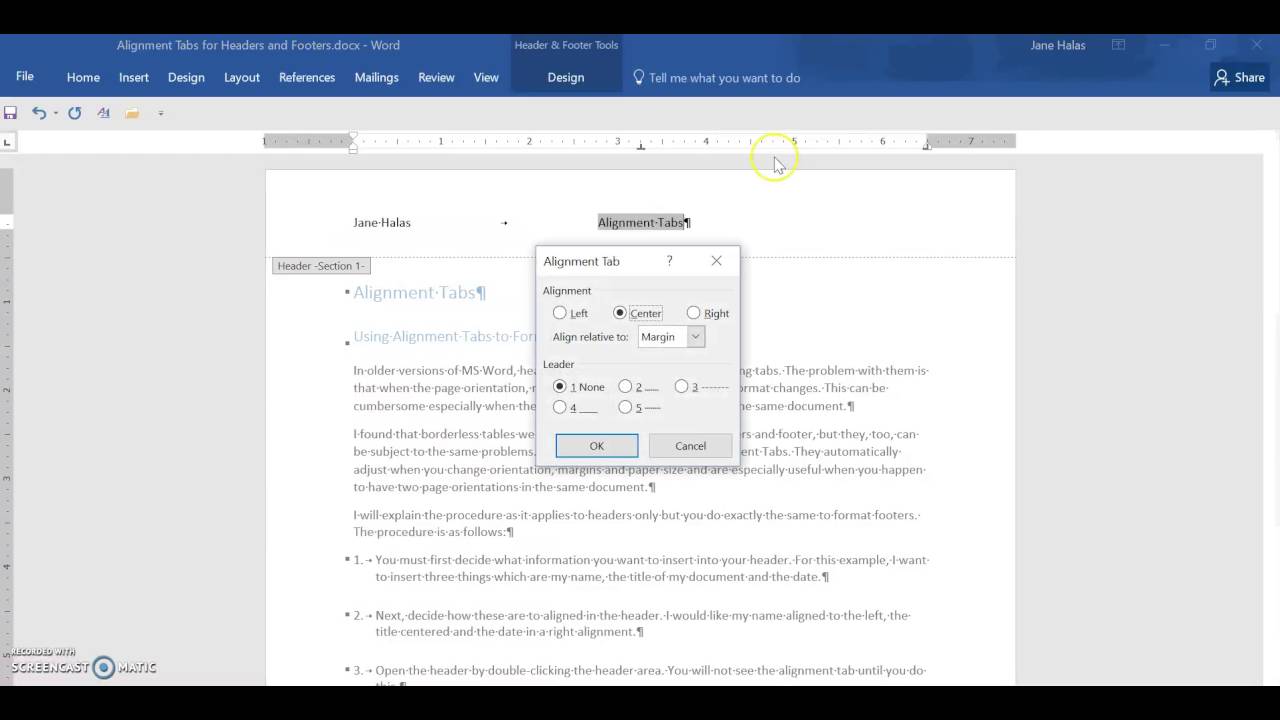
- Double-click on the header to enter the editing mode.
- Click and drag the header text or image to align it with the desired position within the header margin.
Ensure that the header blends seamlessly with the content by aligning it to your preference. Take the time to experiment with different alignments and positions until you achieve the desired result.
In conclusion, aligning and customizing header margins in Word is a simple yet effective way to enhance the overall appearance of your document. By following the steps outlined in this blog post, you can easily access the header options in Word, adjust the header margin size, and align the header margin with the content. By paying attention to these details, you can create professional and visually appealing documents that leave a lasting impression.
Customizing Headers For Different Sections
Adjusting header margins in Word allows you to customize headers for different sections of your document, creating a visually appealing and organized layout for your content. By following a few simple steps, you can easily modify the spacing and alignment of your headers to suit your specific needs.
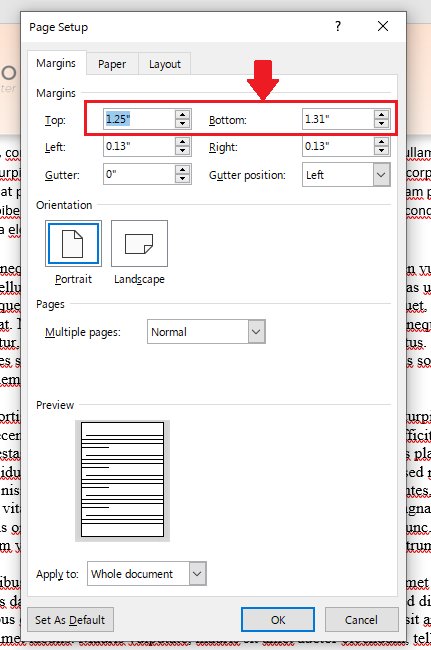
Customizing headers for different sections is an essential part of creating well-organized and visually appealing documents in Word. By adjusting header margins, you can ensure that each section stands out and catches the reader’s attention. This not only helps in making your document more readable but also adds a professional touch to your work. In this section, we will explore how to customize headers for different sections in Word, including creating multiple headers, customizing margins for each section, and differentiating header styles for consistent alignment. To begin creating multiple headers, you can use different levels of heading styles in Word. This allows you to differentiate between various sections within your document. For example, you can use Heading 1 for the main section headers and Heading 2 for subsection headers. By using these various levels of headings, you can create a clear hierarchy for your document, making it easier for the reader to navigate. Once you have created multiple headers, the next step is to customize the margins for each section. By adjusting the header margins, you can control the spacing between the header and the main body of the text. To customize the margins for a specific header section, you can follow these simple steps: 1. Select the desired header section by clicking on the header text. 2. Go to the “Layout” tab in the Word toolbar. 3. Click on the “Margins” button. 4. Choose “Custom Margins” from the drop-down menu. 5. In the “Page Setup” dialog box, adjust the top margin value under the “Margins” tab. 6. Click “OK” to apply the new margin settings. By customizing the margins for each section, you can create a visually pleasing layout for your document. This ensures that the headers are well-aligned and stand out from the rest of the content. In addition to adjusting the margins, it is also important to differentiate the header styles for consistent alignment. When creating headers, it is essential to adhere to HTML syntax for better SEO optimization. Each header should be marked with the appropriate HTML syntax, such as
Credit: grad.ncsu.edu
Credit: www.youtube.com
Frequently Asked Questions For How To Adjust Header Margins In Word
How Do I Adjust Header Margins In Word?
To adjust header margins in Word, go to the “Layout” tab, click on “Margins,”
and choose “Custom Margins.” Then, enter the desired values for the header margins and click “OK.”
Can I Adjust Header Margins For Specific Sections In Word?
Yes, you can adjust header margins for specific sections in Word. Go to the section where you want to change the header margins,
click on “Page Setup,” go to the “Layout” tab, click on “Margins,”
and choose “Custom Margins.” Then, modify the header margins and click “OK.”
How Do I Set Different Header Margins For Odd And Even Pages In Word?
To set different header margins for odd and even pages in Word,
go to the “Layout” tab, click on “Margins,” and choose “Custom Margins.” In the “Multiple Pages” section, select “Mirror Margins.” Then, enter the desired values for the header margins and click “OK.”
Why Are My Header Margins Not Changing In Word?
If your header margins are not changing in Word, make sure you are in the correct section. Header margins can be set independently for each section. If you are in the wrong section,
the changes might not be applied to the desired area.
Conclusion
To sum up, adjusting header margins in Word is a simple yet important task that can enhance the overall appearance and organization of your documents. By following the step-by-step guide provided in this blog post, you can easily modify the header margins to suit your specific needs.
Whether you’re looking to create professional documents or simply improve readability, mastering this skill will undoubtedly be advantageous. So, why wait? Start exploring the various possibilities and take your Word documents to the next level!