To adjust the calendar week in Outlook, go to the File tab, click on Options, select Calendar, and under Work time, choose the desired first day of the week. In Outlook, you can easily modify the calendar week to suit your preferences by customizing the first day of the week in the Calendar options.
By following a few simple steps, you can make sure your Outlook calendar aligns with your preferred week structure. Introducing an efficient way to adjust the calendar week in Outlook, this guide will walk you through the steps required to customize the first day of the week in the Calendar options.

Whether you prefer starting your week on a Monday, Sunday, or any other day, this quick adjustment will ensure your Outlook calendar is perfectly aligned with your preferences. With just a few clicks, you can easily modify the calendar week structure to fit your unique needs and optimize your productivity. Follow this guide to take full control over your Outlook calendar and streamline your schedule management.

Credit: www.alitajran.com

Understanding Calendar Week In Outlook
What Is A Calendar Week In Outlook?
A calendar week in Outlook refers to a specific seven-day period marked on the Outlook calendar. It starts on a user-defined day, usually either Sunday or Monday, and ends on the same weekday of the following week. This feature allows Outlook users to have a clear view of their weekly appointments and obligations, ensuring effective time management.
Importance Of Correctly Adjusting The Calendar Week
Adjusting the calendar week in Outlook is crucial to ensure accurate scheduling and effective planning. When the calendar week is not set correctly, it can lead to confusion and mismanagement of appointments and tasks. By accurately adjusting the calendar week, you can:
- Organize your weekly schedule efficiently
- Keep track of upcoming events and deadlines
- Plan and allocate time for various activities and commitments
Whether you are an individual or part of a team, having a correctly adjusted calendar week in Outlook helps in avoiding scheduling conflicts and maximizing productivity.
Credit: support.microsoft.com
Methods To Adjust The Calendar Week In Outlook
Learn how to adjust the calendar week in Outlook with simple methods. This article provides step-by-step instructions on how to easily modify the calendar week in Outlook for better organization and planning.
When it comes to managing your schedule, Outlook is a powerful tool that offers various options for adjusting the calendar week. In this blog post, we will explore three methods to adjust the calendar week in Outlook – Automatic adjustment using the ‘Work Week’ settings, Manual adjustment using the ‘Change Time Zone’ option, and Using plugins or add-ons for advanced calendar week adjustments.
Automatic Adjustment Using The ‘work Week’ Settings
If you want Outlook to automatically adjust the calendar week based on your work schedule, you can utilize the ‘Work Week’ settings. To access this option, follow these steps:
- Open Outlook and go to the calendar view.
- Click on the ‘File’ tab in the top left corner.
- From the drop-down menu, select ‘Options’.
- In the Outlook Options window, click on ‘Calendar’.
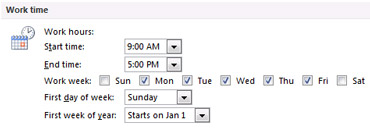
- Under the ‘Work Time’ section, you will find the ‘First day of the week’ and ‘First week of the year’ options.
- Select the desired day for the start of the week and choose the appropriate week numbering system.
- Click ‘OK’ to save your changes.
With these settings in place, Outlook will adjust the calendar week automatically according to your work week preferences, making it convenient for you to plan and organize your schedule.
Manual Adjustment Using The ‘change Time Zone’ Option
If you frequently travel across different time zones or need to adjust your calendar week manually for any other reason, Outlook provides the option to change the time zone. Follow these simple steps:
- Go to the calendar view in Outlook.
- Click on the ‘File’ tab in the top left corner.
- Select ‘Options’ from the drop-down menu.
- In the Outlook Options window, click on ‘Calendar’.
- Scroll down to the ‘Time zones’ section.
- Click on the ‘Change time zone’ button.
- Choose the appropriate time zone from the drop-down list.
- Click ‘OK’ to save your changes.
Now, your calendar week will be adjusted according to the selected time zone, allowing you to effectively manage your schedule regardless of your location.
Using Plugins Or Add-ons For Advanced Calendar Week Adjustments
If you require more advanced options or additional features to adjust the calendar week in Outlook, you can explore the use of plugins or add-ons. These extensions provide greater flexibility and customization for your calendar settings. You can find various plugins or add-ons available online that cater to different needs and preferences. Simply search for the desired plugin, download and install it, and follow the instructions provided by the developer to adjust the calendar week according to your requirements.
By utilizing these methods – automatic adjustment with ‘Work Week’ settings, manual adjustment using the ‘Change Time Zone’ option, or using plugins or add-ons for advanced calendar week adjustments – you can optimize your Outlook experience and effortlessly manage your schedule with a calendar week that suits your needs.
Tips And Best Practices For Calendar Week Adjustment
When it comes to effectively managing your time and appointments, adjusting the calendar week in Outlook can be a helpful tool. Whether you’re dealing with different time zones, work schedule changes, or personal preferences, making the necessary adjustments ensures your calendar accurately reflects your commitments. In this article, we’ll explore some tips and best practices for adjusting the calendar week in Outlook.
Ensure Correct Time Zone Settings
One of the first steps to consider when adjusting the calendar week in Outlook is ensuring that your time zone settings are correct. This will ensure accurate scheduling and prevent any confusion related to meetings or appointments. To change your time zone settings in Outlook, follow these simple steps:
- Open Outlook and navigate to the File tab at the top left corner.
- Click on Options and then select Calendar.
- Scroll down to the Time zones section and click on the drop-down menu to choose your desired time zone.
- Click OK to save the changes.
By correctly setting your time zone, you’ll avoid any discrepancies that can occur when scheduling events across different regions or when traveling.
Consider Your Work Schedule And Preferences
Another important factor to take into account when adjusting the calendar week in Outlook is your work schedule and personal preferences. Outlook allows you to customize your calendar to meet your specific needs, such as displaying certain days as non-working days, adjusting the start and end times of the workday, or highlighting specific time slots for specific tasks. To make these adjustments:
- Navigate to the File tab and click on Options.
- Select Calendar and then click on the Work Time button under the Work Time section.
- In the Work Week section, you can configure your work schedule and preferences by selecting the desired working days, start and end times, and even the first day of the week.
- Click OK to save the changes.
By customizing your work schedule and preferences, you can ensure that your calendar reflects your availability and helps you stay organized.
Regularly Review And Update Calendar Week Adjustments
To maintain an accurate and up-to-date calendar, it’s important to regularly review and update your calendar week adjustments in Outlook. Life is dynamic, and schedules can change, so it’s crucial to ensure that your calendar information matches your current commitments. Set aside a regular time to review your calendar and make any necessary adjustments, such as updated time zone settings, work schedule changes, or personal preferences.
By regularly reviewing and updating your calendar week adjustments, you’ll have greater control over your schedule, allowing you to efficiently manage your time and commitments.
Credit: blog.affinityconsulting.com
Frequently Asked Questions On How To Adjust Calendar Week In Outlook
How Do I Adjust The Calendar Week In Outlook?
To adjust the calendar week in Outlook, go to the “File” tab, click on “Options,” select “Calendar,” and check the “Use ISO 8601 week numbering” box. This will align your calendar week numbering with the standard ISO format.
Why Should I Adjust The Calendar Week In Outlook?
Adjusting the calendar week in Outlook can help you stay in sync with international standards and ensure consistent numbering across different devices and platforms. It also allows for accurate scheduling and collaboration with colleagues and clients worldwide.
Can I Adjust The Calendar Week Numbering In Outlook To Match My Country?
Yes, you can adjust the calendar week numbering in Outlook to match the week numbering system used in your country. By selecting the appropriate option in the settings, you can align the calendar week numbering with the local conventions of your region.
How Does Adjusting The Calendar Week Affect My Outlook Appointments?
Adjusting the calendar week in Outlook does not affect your existing appointments or events. It only changes the way the weeks are numbered in the calendar view. Your appointments and events will remain in their respective dates and times.
Conclusion
Adjusting the calendar week in Outlook is a simple yet effective way to stay organized and on top of your schedule. By following the steps outlined in this blog post, you can easily customize your calendar to suit your needs.
Whether you’re a busy professional or a student managing multiple commitments, Outlook’s flexibility allows you to personalize your experience. So go ahead and take control of your calendar week in Outlook and maximize your productivity today!