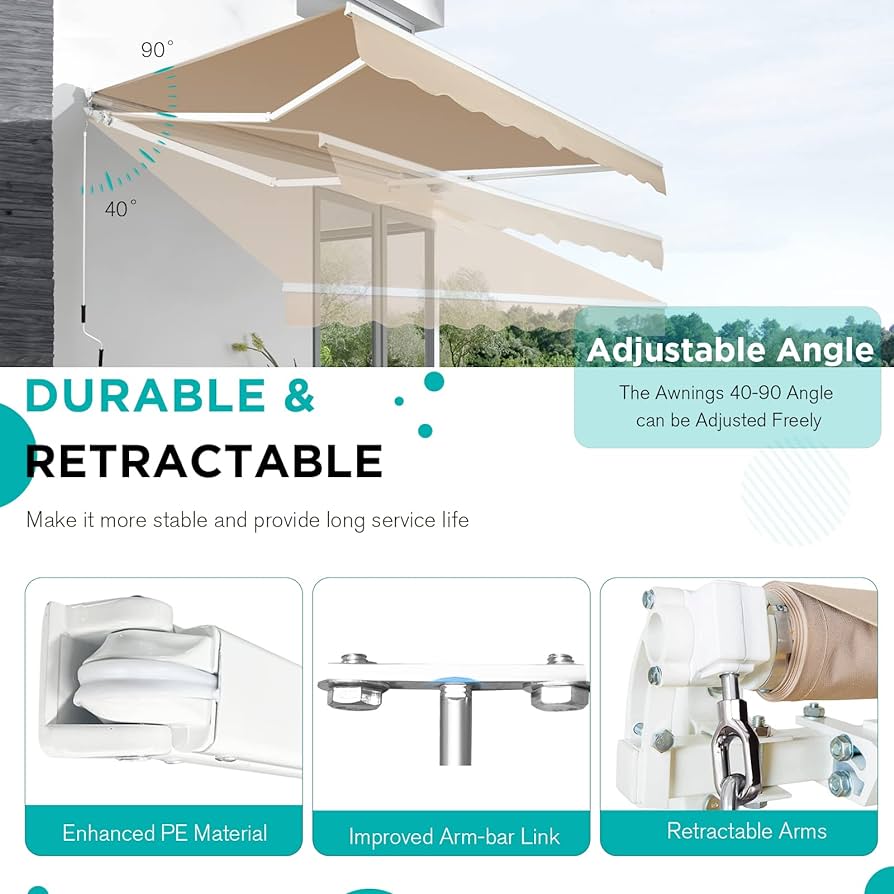
To adjust awning arms, locate the adjustment knobs and turn them to the desired positions. With a few simple steps, you can easily modify the angle and height of your awning arms to suit your needs.
Adjusting the arms of an awning may seem like a daunting task, but it doesn’t have to be. Whether you want to change the angle for better sun protection or lower the height for added convenience, adjusting awning arms can be done quickly and easily.

We will guide you through the process of adjusting your awning arms, ensuring that you can create the ideal setting for your outdoor space. So, let’s get started and learn how to adjust awning arms effectively.

Credit: americantent.com

Step 1: Determine The Type Of Awning Arm
Before making any adjustments to your awning arms, it’s important to first determine which type of awning arm you have. There are two primary types: manual awning arms and motorized awning arms. Knowing which type you have will help you understand the specific steps needed to make the adjustments.
Manual Awning Arms
If you have a manual awning arm, the adjusting process is relatively straightforward. Here’s what you need to do:
- Start by locating the manual adjusting knobs or levers on your awning arms. These are usually situated near the main hinge or joint.
- Using your hand, turn the adjusting knobs or move the levers to loosen them. This will allow you to adjust the angle of the awning arm.
- Once the adjustment is made, tighten the knobs or levers to secure the new position of the awning arm.
It’s important to note that different awning models may have slightly different mechanisms for manual adjustment. Therefore, it’s always a good idea to consult your awning’s manual or contact the manufacturer for specific instructions.
Motorized Awning Arms
If your awning arms are motorized, the process of adjustment may be a bit different. Here are the general steps to follow:
- Locate the control panel or remote for your motorized awning arms. This is typically situated near the interior wall where the awning is mounted.
- Use the control panel or remote to activate the motorized awning arms. This will allow you to adjust the position of the arms.
- Using the control panel or remote, adjust the angle of the awning arms to your desired position.
Just like with manual awning arms, it’s important to consult your awning’s manual or contact the manufacturer if you encounter any difficulties or need specific instructions for adjustment.

Credit: www.amazon.com
Step 2: Prepare The Necessary Tools
Before you can start adjusting your awning arms, it’s important to gather all the tools you’ll need for the job. The tools required may vary depending on whether you have manual or motorized awning arms. Here is a breakdown of the tools you’ll need:
Tools Required For Manual Awning Arms:
- A wrench
- A ladder or step stool
- A measuring tape
- A level
These essential tools will help you make precise adjustments and ensure your manual awning arms are properly aligned.
Tools Required For Motorized Awning Arms:
- A remote control or wall switch (specific to your motorized awning)
- A ladder or step stool
- A measuring tape
- A level
In addition to the basic tools needed for manual awning arms, motorized awning arms require a remote control or wall switch to operate the motor. This will allow you to make adjustments with ease and convenience.
By having the right tools on hand, you can ensure a smooth and hassle-free process when adjusting your awning arms. Now that you’re prepared, let’s move on to the next step.
Step 3: Adjust The Awning Arms
Once you have secured the awning fabric, it’s time to adjust the awning arms. The process may differ depending on whether you have a manual or motorized awning. We will discuss the adjustment steps for each type below.
Adjusting Manual Awning Arms
If you have a manual awning, adjusting the arms is a relatively simple process. Follow these steps to ensure your awning is properly adjusted:
- Start by identifying the awning arms on both sides of the awning. These arms are responsible for extending and retracting the awning fabric.
- Locate the adjustment knobs or screws on each arm. These are usually found near the base of the awning arms.
- Loosen the adjustment knobs or screws on both arms. This will allow you to make the necessary adjustments.
- Next, determine if you need to increase or decrease the tension on the awning fabric. If the fabric sags, you may need to increase the tension. Conversely, if the fabric is too tight, you may need to decrease the tension.
- Rotate the adjustment knobs or screws clockwise to increase tension and counterclockwise to decrease tension. Make small adjustments and test the fabric tension by extending and retracting the awning.
- Continue adjusting the tension until the awning fabric is taut and properly positioned. Once satisfied with the adjustment, tighten the adjustment knobs or screws to secure the arms in place.
By following these steps, you will be able to adjust the arms of your manual awning and ensure optimal performance and functionality.
Adjusting Motorized Awning Arms
If you have a motorized awning, the process of adjusting the arms may require some additional steps. Here’s how you can adjust the arms of a motorized awning:
- Start by locating the motor unit, usually housed within the awning cassette.
- Check if your motorized awning has a remote control or control panel for adjusting the arms. If it does, familiarize yourself with the controls before proceeding.
- Using the remote control or control panel, extend the awning fabric fully.
- Observe the position of the awning fabric and the arm alignment. If there are any misalignments or sagging, adjustments need to be made.
- For motorized awnings with built-in sensors, activate the self-adjustment mode. This mode automatically adjusts the arms based on the awning fabric’s position and tension.
- If your motorized awning does not have a self-adjustment mode, you may need to manually adjust the arms. Refer to the manufacturer’s instructions for specific steps on how to make these adjustments.
- Once the adjustment is complete, retract the awning fabric fully to ensure smooth operation.
By following these steps, you can effectively adjust the arms of your motorized awning and ensure optimal performance and functionality.
Credit: www.homedepot.com
Frequently Asked Questions Of How To Adjust Awning Arms
How Do You Adjust Awning Arms?
To adjust awning arms, start by loosening the tension knob on the arm. Next, use a wrench to turn the adjustment bolt clockwise or counterclockwise to increase or decrease the tension. Finally, tighten the tension knob to secure the adjustment in place.
Why Do Awning Arms Need Adjustment?
Awning arms may need adjustment to ensure proper tension and alignment. Over time, the arms can become loose or misaligned, affecting the functionality of the awning. Adjusting the arms helps maintain the correct tension and ensures the awning operates smoothly.
What Tools Are Needed To Adjust Awning Arms?
To adjust awning arms, you will need a wrench and a screwdriver. The wrench is used to loosen and tighten the tension knob, while the screwdriver is used to turn the adjustment bolt to increase or decrease tension. These tools will help you easily adjust the awning arms.
Conclusion
To wrap up, adjusting awning arms is a simple process that can greatly enhance the functionality and comfort of your outdoor space. By following the step-by-step instructions outlined in this blog post, you’ll be able to easily adapt your awning to the desired angle and height.
Remember to always exercise caution and consult professional assistance if needed. So go ahead, take control, and enjoy the perfect shade and protection that your awning can provide.