To adjust a carburetor, locate the adjustment screw and turn it clockwise to increase fuel flow or counterclockwise to decrease it. Adjust the screw in small increments until the engine runs smoothly and efficiently.
To ensure optimal performance of a carburetor, it is essential to understand how to make adjustments properly. Whether it’s for a two-stroke or four-stroke engine, fine-tuning the fuel mixture can significantly impact the engine’s overall performance. Adjusting the carburetor allows for the regulation of air and fuel flow, which is crucial for efficient combustion.

While the process may seem daunting, following a few simple steps can help beginners master carburetor adjustments and enjoy a well-tuned engine. We will guide you through the necessary steps to adjust a carburetor, ensuring smooth operation, improved fuel efficiency, and optimized engine performance.
Credit: m.youtube.com

Understanding The Carburetor
Adjusting the carburetor is a crucial skill for maintaining optimal engine performance. This guide simplifies the process, helping you understand and make necessary adjustments to keep your engine running smoothly.
Carburetors play a crucial role in ensuring your vehicle runs smoothly by mixing air and fuel in the right proportions. Understanding how carburetors work can help you diagnose and fix issues that may arise. In this section, we will cover what a carburetor is, how it functions, and common problems you may encounter. Let’s dive in!What Is A Carburetor?
A carburetor is a device found in internal combustion engines that controls the air-fuel mixture needed for combustion. It is responsible for ensuring the engine receives the correct amount of fuel and air to operate optimally. Think of it as the heart of your engine’s fuel system.How Does A Carburetor Work?
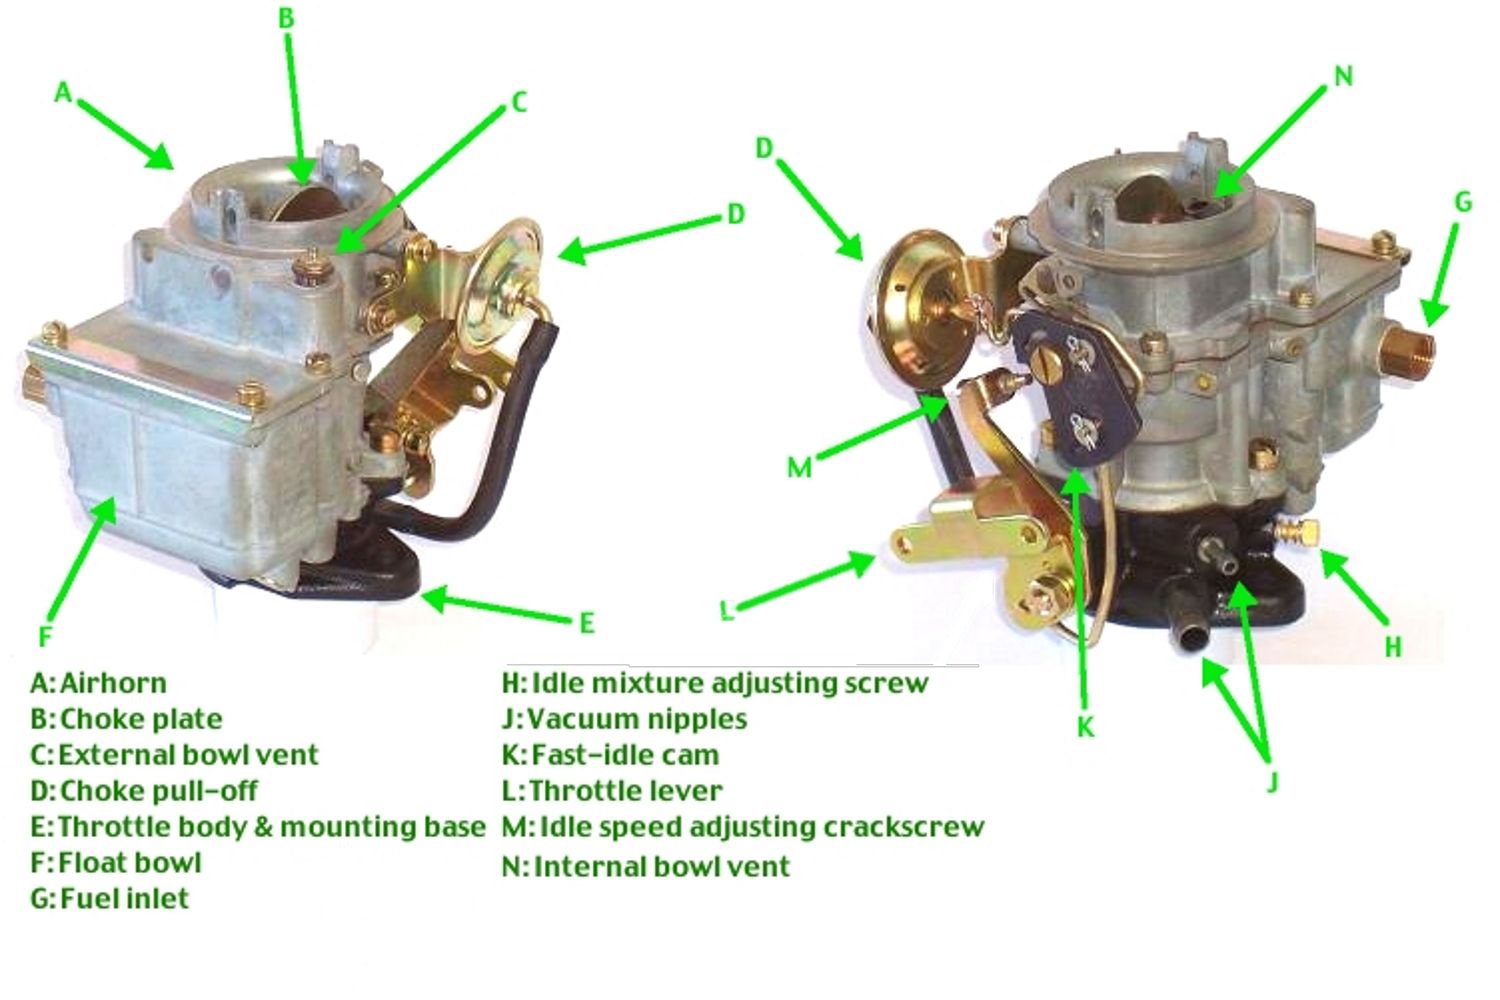
Carburetors have several components that work together to create the ideal air-fuel mixture. Let’s take a look at each component and its role: 1. Main Body: The main body houses most of the carburetor’s components and provides structural support. 2. Air Intake: Air enters the carburetor through the air intake, where it is filtered to remove any impurities. 3. Throttle Valve: The throttle valve, also known as a butterfly valve, controls the amount of air entering the engine. 4. Fuel Bowl: The fuel bowl stores the fuel and feeds it to the carburetor through the main jet. 5. Main Jet: The main jet controls the fuel flow rate into the carburetor based on the engine’s demand. 6. Idle Adjustment: The idle adjustment screw allows you to control the engine’s idle speed. 7. Mixture Screw: The mixture screw regulates the air-fuel mixture at low speeds.Common Problems With Carburetors
While carburetors are reliable, they can develop issues over time. Here are some common problems you may encounter: – Clogged Jets: Fuel jets can become clogged with debris, affecting the fuel flow and resulting in poor engine performance. – Incorrect Fuel Mixture: If the air-fuel mixture is too rich or too lean, it can lead to problems such as rough idling, decreased fuel efficiency, and difficulty starting the engine. – Stuck or Faulty Float: The float, which controls the fuel level in the bowl, can get stuck or become faulty, causing inconsistent fuel flow. – Vacuum Leaks: Leaks in the vacuum system can disrupt the air-fuel ratio, leading to engine hesitation, misfires, and decreased power. – Fuel Contamination: Contaminated fuel can clog the carburetor’s components or create deposits that affect its performance. Understanding these common problems will empower you to troubleshoot and make necessary adjustments to your carburetor, ensuring optimal engine performance. Now that we have covered the basics of understanding carburetors, let’s move on to the process of adjusting them for optimal performance.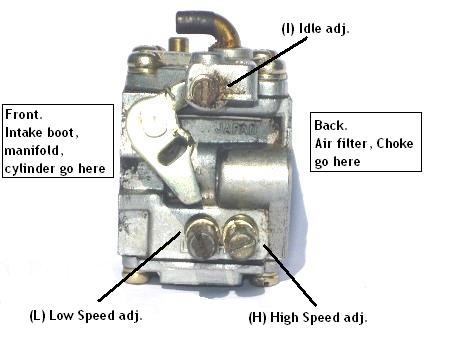
Credit: chainsawr.com
Tools And Materials Needed
Tools and Materials Needed:
Basic Tools
When adjusting the carburetor, you will need a set of basic tools to ensure a smooth process. These tools include:
- A screwdriver set with various sizes to fit different screws on the carburetor.
- A wrench set to loosen or tighten nuts and bolts on the carburetor.
- A socket set to remove and install parts of the carburetor.
- A pair of pliers to grip small components and make adjustments.
Cleaning Materials
To ensure your carburetor functions optimally, it is important to have the following cleaning materials on hand:
- A can of carburetor cleaner to remove dirt, debris, and varnish buildup from the carburetor body.
- A wire brush to scrub away stubborn residue and dirt from carburetor components.
- Clean rags or paper towels to wipe off excess cleaner and ensure a clean working area.
- Compressed air or an air compressor to blow out any remaining debris from small passages within the carburetor.
Safety Equipment
While working with the carburetor, it is crucial to prioritize safety. The necessary safety equipment includes:
- Safety glasses or goggles to protect your eyes from any debris or spray that may come out during the cleaning or adjustment process.
- Latex or nitrile gloves to safeguard your hands from the cleaning chemicals and prevent any contamination.
- A well-ventilated workspace or a mask to avoid inhaling any harmful fumes or particles.
Step-by-step Carburetor Adjustment Process
A properly adjusted carburetor is crucial for the smooth running and optimal performance of your engine. Adjusting the carburetor might seem intimidating at first, but with the right steps and precautions, you can do it yourself. In this guide, we will walk you through the step-by-step process of adjusting your carburetor, ensuring your engine runs like a well-oiled machine.
Preparation And Safety Measures
Before diving into the adjustment process, it is essential to take some necessary precautions. Follow these steps to prepare and ensure a safe environment:
- Begin by parking your vehicle in a well-ventilated area, away from any flammable substances.
- Wear goggles, gloves, and not loose clothing to protect yourself from potential fuel spills and other hazards.
- Ensure the engine is turned off and has had enough time to cool down before starting the adjustment process. Disconnect the battery to prevent accidental ignition.
Identifying Adjustment Screws
Understanding the various adjustment screws in your carburetor is crucial before proceeding further. The two primary adjustment screws are:
| Screw | Function |
|---|---|
| Main Jet Adjustment Screw | Controls the fuel mixture at higher RPMs |
| Idle Mixture Screw | Controls the fuel mixture at idle speed |
Adjusting The Idle Mixture
To adjust the idle mixture, follow these steps:
- Start the engine and let it idle for a few minutes to reach the operating temperature.
- Locate the idle mixture screw and carefully turn it clockwise until it is lightly seated. Then, turn it counterclockwise by the recommended number of turns mentioned in the vehicle’s manual.
- While the engine is idling, turn the idle mixture screw slightly clockwise until you notice a smooth and steady idle. Be careful not to overtighten it.
Adjusting The Idle Speed
To adjust the idle speed of your engine, follow these steps:
- Locate the idle speed screw, often found near the throttle linkage or governor arm.
- Start the engine and allow it to stabilize at idle speed. Then, turn the idle speed screw in a clockwise direction to increase the speed or counterclockwise to decrease the speed. Make minor adjustments until you reach the desired idle speed.
Fine-tuning The Carburetor
Once you have adjusted the idle mixture and speed, it’s time to fine-tune your carburetor:
- Take your vehicle for a test drive to evaluate its performance.
- Pay attention to acceleration, idle quality, and overall engine responsiveness.
- If necessary, make further minor adjustments to the idle mixture or speed to achieve optimal performance.
Testing The Adjustments
To ensure that the adjustments have been properly made, you should test your vehicle:
- Perform a thorough visual inspection to check for any leaks or irregularities.
- Listen to the engine sound for any signs of rough idle or misfiring.
- Take note of the vehicle’s overall fuel efficiency and power delivery.
By following this step-by-step carburetor adjustment process, you can fine-tune your engine’s performance and achieve a smoother and more efficient ride. Remember to consult your vehicle’s manual for specific instructions and recommended settings if needed.

Credit: www.mopedarmy.com
Frequently Asked Questions For How To Adjust Carburetor
How Do I Know If My Carburetor Needs Adjusting?
If your engine is running rough, idling too fast or too slow, or using more fuel than usual, it’s likely that your carburetor needs adjustment. Look for symptoms like these to determine if it’s time to adjust your carburetor.
What Tools Do I Need To Adjust A Carburetor?
To adjust a carburetor, you’ll need a few basic tools like a screwdriver, a wrench, and a tachometer. These tools will help you access and modify the various adjustment screws and settings on your carburetor.
Can I Adjust The Carburetor Myself?
Yes, adjusting a carburetor can be done DIY-style, but it’s important to have knowledge of the process and an understanding of the specific steps involved. If you’re not comfortable or experienced with carburetor adjustments, it’s best to consult a professional for assistance.
What Are The Basic Steps To Adjust A Carburetor?
Adjusting a carburetor involves a few key steps: first, locate the idle mixture screw and turn it until it’s in the factory recommended position. Then, adjust the idle speed screw to the desired RPM. Finally, fine-tune the air/fuel mixture by adjusting the main jet and needle settings.
Conclusion
Adjusting the carburetor is a critical skill for maintaining the performance of your vehicle. By carefully following the steps outlined in this guide, you can ensure that your carburetor is properly calibrated, resulting in improved fuel efficiency and engine performance.
Take your time and be patient during the adjustment process, and don’t hesitate to seek professional help if needed. Happy tuning!